
શરૂઆત
Binance India KYC: જરૂરી દસ્તાવેજો અને 8 પગલાની verification પ્રક્રિયા
Binance India KYC માટે account પોતાના નામે બનાવો, હાલની document requirements તપાસો, 8-step verification process પૂર્ણ કરો અને rejection અથવા Pending status સુધારો.
આ લેખ Binance India KYC ની પ્રક્રિયા અને compliance સમજાવે છે; તેને કાનૂની, રોકાણ અથવા કર સલાહ ન ગણશો. Platform interface, સ્વીકારાતા documents અને regional eligibility બદલાઈ શકે છે. માહિતી મોકલતાં પહેલાં તમારા account માં દેખાતી હાલની requirements, નવીનતમ terms અને સ્થાનિક કાયદો તપાસો.
તમારું લક્ષ્ય એવું ભારતીય વ્યક્તિગત account તૈયાર કરવાનો છે જેમાં સાચી માહિતી હોય, account નું નિયંત્રણ અને recovery તમારા હાથમાં હોય તથા identity verification પૂર્ણ થયેલું હોય. Account બની જવું એટલે દરેક product ઉપલબ્ધ થઈ ગયો એવું અહીં માનવામાં આવતું નથી.
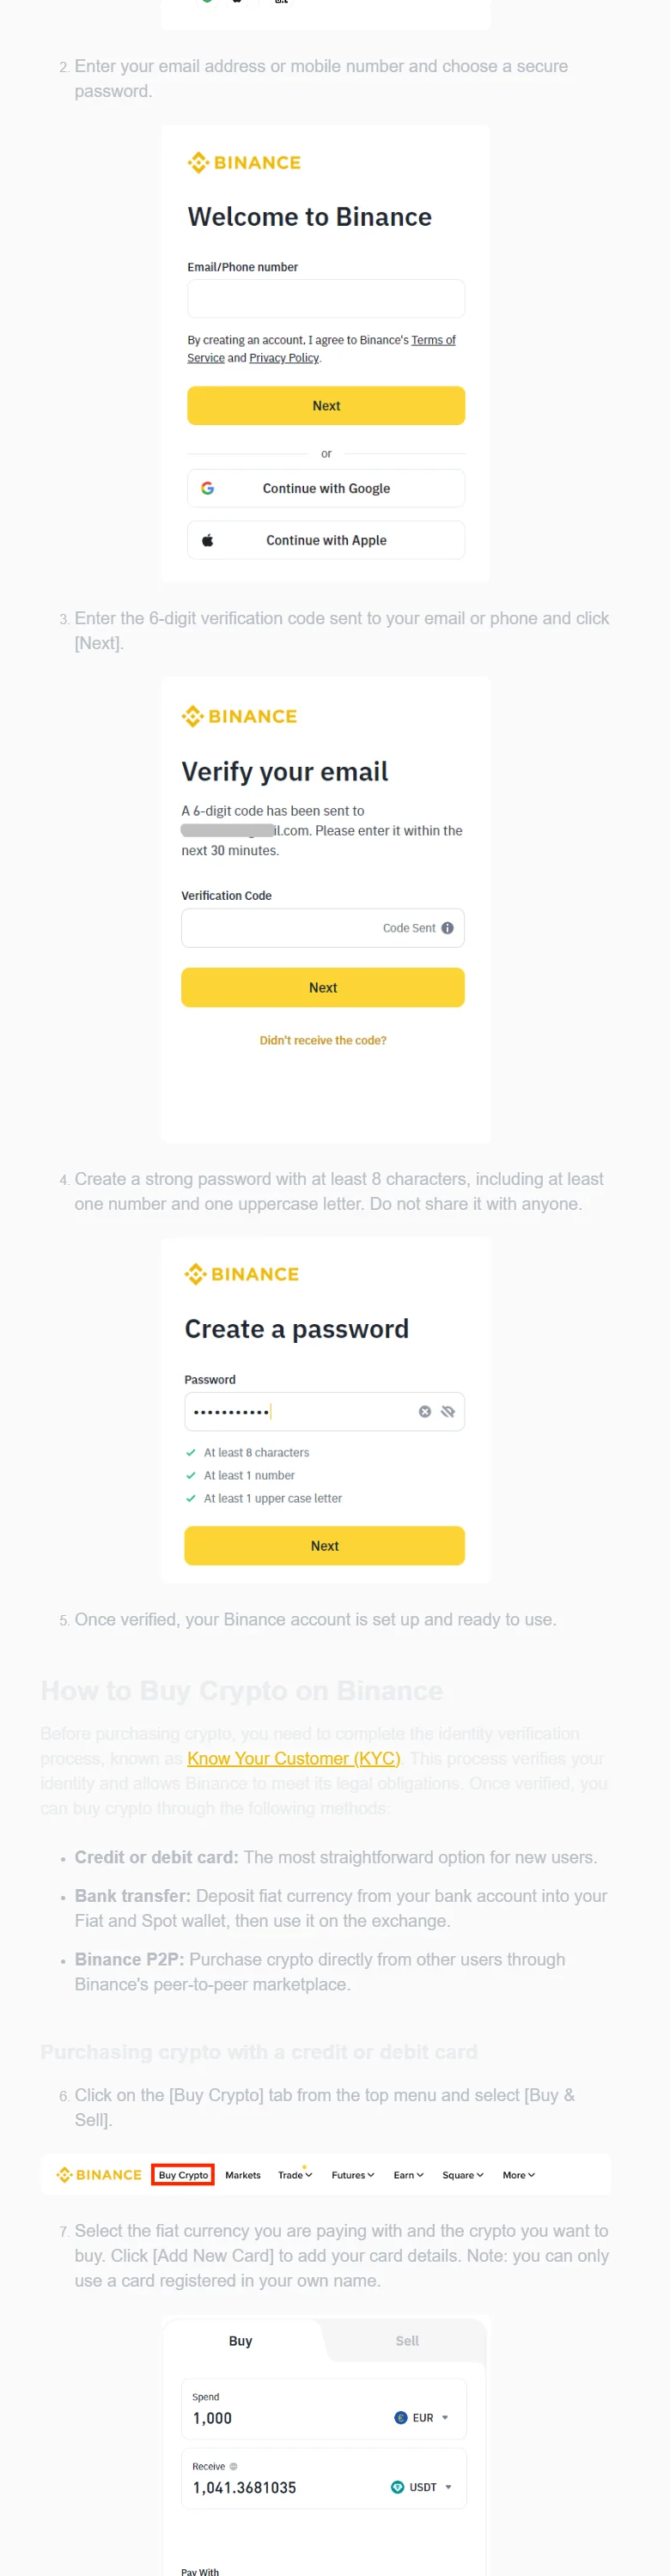
Binance Academy ની સત્તાવાર શરુઆતની માર્ગદર્શિકામાં દેખાતું નોંધણી પાનું; ઉદાહરણનું email ઢાંકેલું છે. Entry point પ્રદેશ અને version પ્રમાણે બદલાઈ શકે છે. સ્રોત: Binance Academy; screenshot: 2026-08.
Binance ખાતું બનાવો અને સંભવિત ફી છૂટ મેળવો
જો હજી તમારું Binance ખાતું નથી, તો નીચેની લિંક Binance નું નોંધણી પાનું ખોલે છે:
👉 Binance પર નોંધણી કરો — ટ્રેડિંગ ફીમાં 20% સુધીની છૂટ મળી શકે છે →
નોંધણી પાનાં પર આમંત્રણ કોડ BNB186 દેખાય છે કે નહીં તે તપાસો; જરૂર હોય તો કોડ જાતે દાખલ કરો. વાસ્તવિક છૂટનો દર, સમયગાળો અને પાત્રતા Binance ના તે સમયના નોંધણી પાનાં તથા તમારા ખાતામાં દેખાતી શરતો પર આધારિત છે અને બદલાઈ શકે છે.
પ્રમોશનલ ખુલાસો: ઉપરની લિંક પ્રમોશનલ લિંક છે. તે KYC, વિસ્તારની પાત્રતા, પ્રોડક્ટની શરતો અથવા જોખમ તપાસને બદલે નહીં.
Binance India KYC ક્યારે પૂર્ણ ગણાય?
FIU-IND ના 19 જૂન 2024 ના order મુજબ Binance ભારતમાં Prevention of Money Laundering Act હેઠળ reporting entity છે. Order માં અગાઉની compliance ખામીઓ અને ₹18.82 crore penalty પણ નોંધાયેલી છે. તેનો અર્થ platform પર AML/CFT, customer identification અને record-keeping જેવી જવાબદારીઓ છે. તે દરેક product માટે government endorsement, fund protection, investment approval કે tax exemption નથી.
પ્રક્રિયા પૂરી થયા પછી આ છ બાબતો સાચી હોવી જોઈએ:
- Account તમારા જ લાંબા સમયના email અથવા mobile પરથી બનાવેલું હોય.
- Legal name, date of birth અને residence સબમિટ કરેલા document સાથે મેળ ખાતાં હોય.
- Verification page પર Verified/Completed અથવા સમાન final status હોય; Pending, Action required કે Rejected નહીં.
- Phishing સામે વધુ મજબૂત ઓછામાં ઓછો એક login factor ચાલુ હોય અને recovery material offline તમારી પાસે હોય.
- Pending document અથવા manual-review notice બાકી ન હોય.
- Stocks, bStocks અથવા બીજા product ની regional eligibility અલગથી તપાસેલી હોય; KYC ને product eligibility ન માનેલી હોય.
માત્ર registration email verify થવાથી KYC પૂર્ણ થતું નથી. KYC પૂર્ણ થાય તોય US shares ખરીદવાની eligibility મળવાની ખાતરી નથી.
Binance KYC માટે કયા દસ્તાવેજો જોઈએ અને કેવી રીતે તૈયાર કરવા
| તૈયારી | ચોક્કસ જરૂરિયાત | કારણ |
|---|---|---|
| નોંધણીનો પ્રવેશ | આ લેખની આમંત્રણ લિંક અથવા Binance App વાપરો | જાહેરાત, DM અથવા નકલી પાનાથી બચવા |
| Contact access | લાંબા સમય સુધી તમારા control માં રહે તે email અને mobile; email પર પણ 2FA | Email સામાન્ય રીતે recovery entry છે |
| Legal data | Government ID પ્રમાણે name, birth date, nationality અને current residence | Spelling અથવા region mismatch rejection નું સામાન્ય કારણ છે |
| Identity document | Valid government-issued photo ID; address proof ફક્ત screen માગે ત્યારે | Accepted list country, account અને સમય પ્રમાણે બદલાય છે |
| Capture setup | Original document, clean camera, even light, live-face check માટે યોગ્ય device | Glare, crop અને screen-photo failure ટાળવા |
| Extra evidence | Source-of-funds અથવા due-diligence material ફક્ત official flow માગે ત્યારે | કેટલાક account enhanced review અથવા periodic review માં જાય છે |
PAN, Aadhaar, bank proof અથવા કોઈ ચોક્કસ address document દરેક Indian account માટે ફરજિયાત છે એવું પહેલાંથી ન માનો. Binance KYC material documents ના સામાન્ય પ્રકાર બતાવે છે; આ submission માટે તમારા account ની હાલની verification screen પર દેખાતી યાદી અંતિમ છે.
Binance KYC ચકાસણીની પ્રક્રિયા: 8 પગલાં
પગલું 1: ઉપર આપેલી આમંત્રણ લિંક અથવા Binance App થી શરૂ કરો. Social DM, search ad અથવા અજાણી વ્યક્તિએ મોકલેલી link ન ખોલો. નોંધણી પાનું ખોલ્યા પછી આમંત્રણ કોડ BNB186 દેખાય છે કે નહીં તે તપાસો.
પગલું 2: તમારા પોતાના નામે account બનાવો. લાંબા સમય સુધી તમારા નિયંત્રણમાં રહે તે email/mobile વાપરો. બીજે ક્યાંય ન વાપરેલો લાંબો password રાખો. Email/mobile verification પછી account UID અને જોડાયેલી contact detail નો record રાખો; password chat app માં ન સાચવો.
પગલું 3: Minimum security પહેલાં ગોઠવો. Profile/Account/Security (નામ થોડું બદલાઈ શકે) માં Passkey અથવા authenticator 2FA ચાલુ કરો અને recovery information સુરક્ષિત રાખો. વિગત માટે → Account security guide જુઓ.
પગલું 4: Identity Verification ખોલો. Profile, Identification, Verification અથવા screen પર દેખાતી સૂચનામાંથી પ્રવેશો. સાચો country/residence પસંદ કરીને હાલમાં કયા document અને format સ્વીકારાય છે તે લખી લો. Menu બદલાય તો identity અથવા verification status શોધો.
પગલું 5: કાનૂની વિગતો ભરો. નામનો ક્રમ, spelling, date of birth અને address પસંદ કરેલા document સાથે મેળવો. Nickname, ટૂંકું નામ, જૂનું address અથવા બીજી વ્યક્તિની detail ન ભરો.
પગલું 6: મૂળ document મોકલો. ચારેય ખૂણા અને લખાણ સ્પષ્ટ દેખાવા જોઈએ તથા glare ઓછું હોવું જોઈએ. Screen નો ફોટો, મહત્વની માહિતી કપાયેલી image અથવા edited image ન આપો. Selfie/live movement માગવામાં આવે તો સ્થિર internet, સ્વચ્છ lens અને સરખો પ્રકાશ વાપરો.
પગલું 7: Status વાંચો; અંધાધૂંધ resubmit ન કરો. Submit time અને screen status નોંધો. Pending/Under review એટલે process ચાલુ; Action required એટલે ચોક્કસ supplement; Rejected હોય તો reason પહેલાં વાંચો. નવી સૂચના વગર બીજું account ખોલવું કે અલગ data વારંવાર મોકલવું નહીં.
પગલું 8: Supplement ફક્ત official channel માં આપો. Address, source of funds અથવા enhanced due-diligence document App verification page અથવા official support entry મારફતે જ આપો. Telegram, WhatsApp અથવા X DM ના “support” ને ID, selfie, OTP કે recovery code ક્યારેય ન આપો.
આ કોષ્ટકથી Verified status ચકાસો
| Check | Pass થવાનો અર્થ | Pass ન થાય તો |
|---|---|---|
| Account control | Email, mobile અને UID તમારા control માં | Contact detail સુધારો; funds ન મોકલો |
| Identity status | Verified/Completed અથવા સમાન final status | Pending, supplement અથવા rejection reason પ્રમાણે કામ કરો |
| Personal data | Name, birth date, residence અને document મેળ ખાતાં | Official correction flow વાપરો; duplicate account નહીં |
| Security | Passkey/authenticator ચાલુ અને recovery offline | Funding પહેલાં security પૂર્ણ કરો |
| Pending action | Verification centre માં unread request નથી | માંગેલું પૂરું કરીને submission record રાખો |
| Product eligibility | જરૂરી product તમારા account/region માં દેખાય અને terms મંજૂર કરે | VPN કે બીજાનું account વાપરી bypass ન કરો |
છેય ચકાસણીઓ pass થાય ત્યારે જ પ્રક્રિયા પૂર્ણ ગણાય. Verified status અને તારીખનો screenshot વ્યક્તિગત record માટે રાખી શકો; ID images બિનજરૂરી રીતે gallery અથવા chat app માં છૂટાં ન રાખો.
KYC Pending અથવા Rejected હોય તો કારણ પ્રમાણે સુધારો
| Error અથવા પરિસ્થિતિ | પહેલાં તપાસો | આગળનું પગલું |
|---|---|---|
| Name/date mismatch | Account અને ID નો order, spelling, date format | Official correction/resubmit entry; fake data નહીં |
| Unsupported/expired document | Type, issuing country, validity અને current accepted list | Screen સ્વીકારે તે valid original document વાપરો |
| Image-quality failure | Corners, glare, blur, crop, camera permission | Even light માં ફરી capture; editing tool નહીં |
| Face-check failure | Internet, lens, light, obstruction અને movement prompt | Stable setup માં retry; screen limit આવે તો stop |
| Region/residence conflict | Actual residence, document country અને selected option | સાચી detail જ આપો; option ન હોય તો official support |
| Source-of-funds/manual review | Notice account ના verification page અથવા Binance App નું છે? Period અને format શું છે? | ફક્ત માંગેલું material આપો અને case number રાખો |
Binance KYC માટે કોઈ નિશ્ચિત approval time ની ખાતરી નથી. Account status અને સત્તાવાર notice જ વિશ્વસનીય સંકેત છે. “બીજા કરતાં વધુ સમય થયો” એટલા માટે data બદલશો નહીં અથવા duplicate account ખોલશો નહીં.
ક્યારે અટકવું અને KYC પછી શું કરવું
આમાંથી કંઈ થાય તો operation બંધ કરીને official support વાપરો: કોઈ VPN, borrowed identity, inconsistent second account, remote access, OTP/Passkey/authenticator recovery code અથવા social DM માં ID માંગે. Product તમારા region માં ન દેખાય તો eligibility check પર અટકો; location બીજા દેશનું બતાવી bypass ન કરો.
KYC પૂર્ણ થયા પછી આ ક્રમ રાખો:
- જરૂરી product તમારા પોતાના account માં ઉપલબ્ધ છે કે નહીં તપાસો અને current Product Terms વાંચો.
- પછી → INR થી USDC funding path વાંચીને fee અને compliance requirement સમજો.
- Entry, fee અને withdrawal path સ્પષ્ટ થયા પછી જ સહન કરી શકાય તેવી નાની રકમથી deposit, operation અને withdrawal test કરો.
- પ્રથમ stock-related order પહેલાં → 10-minute checklist પૂર્ણ કરો.
- વાસ્તવિક કુલ ખર્ચ માટે → Binance Stocks fee ગણતરી વાંચો.
નાની test transaction આગળના fund flow ની ચકાસણી છે; તે KYC approval મેળવવાની યુક્તિ નથી અને ભવિષ્યની review અટકાવતી નથી.
વારંવાર પૂછાતા પ્રશ્નો
KYC પછી ફરી verification આવી શકે?
હા, આવી શકે. KYC ongoing compliance process છે. Data change, risk review અથવા regulatory requirement re-verification કરાવી શકે છે. Binance App અથવા ખાતાની verification notice અનુસરો.
Address proof અથવા source of funds હંમેશા માંગે?
જરૂરી નથી. સામાન્ય KYC માં address/residence information હોઈ શકે છે; enhanced due diligence source of funds માગી શકે છે. શું જોઈએ અને કયો document ચાલે તે current account screen નક્કી કરે છે.
Family member નું account કે document વાપરી શકાય?
ન વાપરવું. Account control, KYC record, transaction history અને withdrawal right અલગ વ્યક્તિના નામે રહી શકે છે; review, dispute અને tax evidence વધુ મુશ્કેલ બને છે.
Verification completed છતાં Stocks કેમ નથી દેખાતું?
Identity verification અને product eligibility બે અલગ gate છે. Region, account type અથવા product terms entry રોકી શકે છે. → Stocks tab ન દેખાય તો શું કરવું જુઓ.
સત્તાવાર સ્ત્રોતો અને ચકાસણી
નીચેના પ્રાથમિક સ્રોતો 2026-08-24 ના રોજ ફરી તપાસવામાં આવ્યા હતા. Interface, document requirements અને product availability બદલાઈ શકે છે; પ્રક્રિયા પહેલાં નવીનતમ version વાંચો.